As a primary data storage for the transactional data for the Zemanta One platform we use PostgreSQL for its robustness, flexibility and time proven stability. Over the years the platform grew a lot both in features and user base and together with that so did our database tables. At the beginning of the project nobody anticipated the sheer amount of data that will eventually be stored and all the table’s primary key ID columns were set to INT as a sort of go-to default data type that is usually used for this column. Taking a space of 4 bytes this allows us to store a range of -2,147,483,648 to +2,147,483,647 integers. Since this is used for an auto incremented value starting at 1 we consider only the positive part. This still looks like a big number - over 2 billion records - but over time we recently started running into a problem that some high volume tables were getting dangerously close to this limit and we had to act.
We needed to change this column’s data type to allow us to store larger numbers. In PostgreSQL case that would be BIGINT - on 8 bytes it has a range from -9,223,372,036,854,775,808 to 9,223,372,036,854,775,807 possible values - over 9 quintillion - that has to be enough.
Migration plan
In order to do that PostgreSQL has a DDL query for that, right?
ALTERTABLE[table]ALTERCOLUMN[column]TYPEBIGINT;
Wait! If you run this on your production database you and your users will probably have a bad time. There is a catch - a change like this forces the database engine to rewrite the entire table. It is due to a binary incompatibility of both data types - the data is stored on a disk in sequential blocks and there is no free space in between to extend it to the larger data type. During the rewrite process it will acquire the very aggressive ACCESS EXCLUSIVE lock that essentially prevents any other operation on the table including reads. This operation and its lock can easily last a couple of hours (depending on the table size and hardware) and cause a complete downtime as other processes will not be able to acquire this resource. At Zemanta we strive for maximum availability to not inconvenience our clients and such a large maintenance window was unacceptable.
We had to come up with a different solution - one that would possibly allow us to mitigate the INT overflow problem without any downtime. In this article we will show you how.
Let’s break it up
To achieve the same goal we can split the process into a couple of independent operations that are by themselves very quick or don’t require such a lock.
Add a new column
The first thing we need to do is to create a new BIGINT column with a temporary name.
ALTERTABLE[table]ADDCOLUMNnew_idBIGINT;
Creating a nullable column with no default value is a quick operation.
Keep them in sync
The next two steps will help us set and keep consistent state with the original column - we create a procedure that will copy the value from the original column to a new column and this procedure will be automatically triggered on every new INSERT or UPDATE.
Now we need to backfill the existing data - copy the values from the original column. This will be the most time consuming operation that can run for hours. But it is ok because we copy the data in smaller quick transactions so the table is always accessible for other processes.
After all the values are copied the original column and new column should both have the same data and thanks to the trigger it’s also staying in sync with the new incoming data.
Column constraints
As the next step we will do a couple of tricks that will later help us create a primary key (PK) constraint on this column. In essence a PK couples two constraints - the data inside the column has to be unique and not null. Dropping the old PK and creating a new one at this point would also acquire ACCESS EXCLUSIVE lock for a longer time period because it would build the UNIQUE index and scan the table to check and set NOT NULL on the column. Since PostgreSQL 9.1 we can provide an already existing unique index when creating the PK, so let’s build it first separately
Crucial part here is the CONCURRENTLY keyword - while it takes more time to build the index it will only acquire the weaker SHARE UPDATE EXCLUSIVE lock that will still allow data changes and reads. Without that, the constraint creation would acquire a SHARE lock which would allow reads but not data changes.
The next thing we need to solve is the NOT NULL constraint. Under the hood, creating a PK will run ALTER COLUMN SET NOT NULL which would trigger a full table scan while locking writes and would not be a quick operation. Since PostgreSQL version 12 this query can skip the full scan if a NOT NULL constraint on the column already exists. In the earlier versions there is unfortunately no way to avoid it (but it’s still a much shorter lock than rewriting the table). We can create the constraint in two steps.
When we create the constraint as NOT VALID it will enforce the constraint only for the new or updated rows but it will not check the existing rows which would again lock the table for writes. We will check them and validate the constraint with a separate query that only acquires the SHARE UPDATE EXCLUSIVE lock that allows both writes and reads.
At this point we have everything ready for the final stage. Up until now the previous steps didn’t interfere with the original column so it can be reversed or started over. The following step makes irreversible changes. In one transaction we need to run a series of queries:
drop the old PK
create the new PK
transfer the existing auto increment sequence
drop the old column
rename the temporary one (new_id) to the original name (id).
If the previous steps were successfully finished it will be a quick operation as it’s mostly only catalogue changes and we covered the PK prerequisites. Since we drop the old column we also need to reanalyze the table to gather correct statistics about it for the query planner to produce optimal queries. We can do this in 3 steps with different statistics targets (a lower statistics target results in a faster ANALYZE step) to have at least some usable statistics right away.
One other thing that needs to be kept in mind is that this will work only if this id column is not used as a foreign key in another table. In order to also support that the previous steps would have to be done also for the foreign key column in the referenced table and the next step would also have to be applied on both tables and foreign keys re-created. Here we will assume the simple case without the foreign key constraints.
The process looks like this:
BEGINTRANSACTION;-- explicitly lock the table against other changes (safety)LOCKTABLE[table]INEXCLUSIVEMODE;-- drop and create the PK using existing indexALTERTABLE[table]DROPCONSTRAINT[table]_pkey,ADDCONSTRAINT[table]_pkeyPRIMARYKEYUSINGINDEXnew_id_unique;-- transfer the sequenceALTERSEQUENCE[table]_id_seqOWNEDBY[table].new_id;ALTERTABLE[table]ALTERCOLUMNnew_idSETDEFAULTnextval('[table]_id_seq');-- drop and rename the columnsALTERTABLE[table]DROPCOLUMNid;ALTERTABLE[table]RENAMECOLUMNnew_idTOid;-- drop the temporary trigger and procedureDROPTRIGGERIFEXISTSset_new_id_triggerON[table];DROPFUNCTIONIFEXISTSset_new_id();COMMIT;-- reanalyze the table in 3 stepsSETdefault_statistics_targetTO1;ANALYZE[table];SETdefault_statistics_targetTO10;ANALYZE[table];SETdefault_statistics_targetTODEFAULT;ANALYZE[table];
Conclusion
Voila! The id column is now BIGINT without any downtime or data loss. In practice we implemented these queries into a script so it allows us better reusability and limits human error in running the queries manually. In this script we also use a couple of useful queries worth mentioning here that check the table state before continuing the execution for extra safety.
-- returns rows if the id column is a foreign key in another table - we don't proceed in that caseSELECTtc.constraint_nameFROMinformation_schema.table_constraintsAStcJOINinformation_schema.key_column_usageASkcuONtc.constraint_name=kcu.constraint_nameJOINinformation_schema.constraint_column_usageASccuONccu.constraint_name=tc.constraint_nameWHEREccu.table_name='[table]'ANDccu.column_name='id'ANDconstraint_type='FOREIGN KEY';-- returns a row if the unique index is created and validSELECTc.oidFROMpg_classcLEFTJOINpg_indexiONc.oid=i.indexrelidWHEREc.relname='new_id_unique'ANDi.indisvalidistrue;-- returns a row if the not null constraint is created and validSELECTconnameFROMpg_constraintWHEREconname='new_id_not_null'ANDconvalidatedistrue;
This post was originally published on jurebajt.com.
Effective state management in front-end development is a challenge, especially in larger and more complex single page applications. Right now, Redux is probably the most popular way of managing state. It is based on a few main ideas:
One source of truth (app state).
State is modified in a “pure” way via reducers.
Reducers are invoked by emitting events to them.
Interested entities are notified about state updates.
At Zemanta we have a client facing dashboard application built as a hybrid Angular app (running AngularJS and Angular side by side). AngularJS part of the app stores some state in components’ controllers and other in global services (implementing a pub-sub pattern). Every feature manages its state in a slightly different way because there are no clear conventions set about state management. As a consequence, the more features we add, the harder it becomes to ensure the state stays consistent across all components and services.
The process of upgrading to Angular gave us the opportunity to rethink how we tackle state management in the app. We didn’t want to introduce another layer of complexity by adding a state management library to the codebase. New Angular framework, TypeScript, new build system and hybrid app bootstrap already brought a lot of additional complexity to the mix. Instead, we used the ideas from Redux to create a state management solution that leverages Angular’s (and RxJS’s) features to do its job.
One could argue that developing a custom solution for state management introduces additional complexity to the codebase too. It would be naive to dismiss such claims. The difference though is in how much of this complexity is added by developing features using Redux versus observable store pattern. The solution we developed is a really stripped down version of Redux. It does not “prescribe” how to handle async actions, how to combine reducers, how to implement middleware etc. Its only role is to provide a simple API to update state object and to subscribe to its updates. Stores are otherwise just good ol’ Angular service classes.
This post explains how one can use the observable store pattern we developed to manage state in Angular apps. The solution was inspired by the following article from Angular University: How to build Angular apps using Observable Data Services.
To showcase the usage of observable stores we’ll build a simple app called Coffee election that lets its users vote for their favorite type of coffee and add their own coffee type to the list of candidates. The source code is available on GitHub: github.com/jurebajt/coffee-election.
Abstract Store class
At the core of observable store pattern is the abstract Store class. It leverages RxJS to achieve data flow similar to Redux. It is implemented like this:
The store’s state (_state$) is a RxJS BehaviorSubject. Changing the state means pushing new state object into the _state$ stream via the setState method. Interested entities can subscribe to state updates by subscribing to the state$ property. It is also possible to get the current state via the state property without subscribing to state updates.
Store class provides a unified interface for all features’ store services to extend. In the next section we’ll have a look at how to use the abstract Store class to implement an example feature store service.
Features’ stores
Feature specific stores are Angular Injectables extending the abstract Store class:
In the code snippet above note the CoffeeElectionState type used when extending the Store. Specifying CoffeeElectionState as the store type adds correct type definitions to the generic store.
CoffeeElectionState is a class representing state object with initial values. In the Coffee election example app it looks like this:
One last thing to do to make this simple example work is to add a super call to CoffeeElectionStore’s constructor in order to correctly initialize the state when creating a new instance of CoffeeElectionStore:
With the above code in place, each instance of CoffeeElectionStore has a way of setting its state and getting the current state or an observable of the state. To make it more useful, additional methods to modify the state (similar to Redux reducers) should be added:
In the example above CoffeeElectionStore’s functionality was extended by defining addVote and addCandidate methods. In essence, these methods modify the state by pushing new state objects into the observable state$ stream via the setState method.
Note how it is impossible to modify the state without notifying listeners about the change. This characteristic of observable stores makes them a perfect fit for implementing one-way data flow in Angular apps - much like with Redux or a similar state management library.
Using injectable store services
App’s state could all be stored in a single global state object. But as the app grows, so does the state object and it can quickly become too big to easily extend it with new features. So instead of storing the whole state in one place, it is better to split the state into smaller chunks. A good way to split the properties is to group them by feature and extract these groups into separate state objects, managed by corresponding stores.
There are two types of stores that emerge from splitting:
global stores that contain globally used state,
component stores that contain the states used by a single component.
To set up a store containing global state accessed by different services and components, the store is listed as a provider in a module’s providers list (root app module or a feature specific module). This way Angular adds a new global provider to its dependency injector. The state in global stores will be available until the page is reloaded.
Note that many global stores can be defined as providers in app’s modules, each managing its own subset of global state. The codebase stays much more maintainable this way, since each store follows the principle of single responsibility.
To use a global store in different parts of the app, the store needs to be defined as their dependency. This way Angular injects the same instance of a global store (defined as singleton provider in AppModule or any other module) into every component/ service depending on it.
example.component.ts:
@Component({...})exportclassExampleComponent{constructor(privateexampleGlobalStore:ExampleGlobalStore){// ExampleComponent has access to global state via exampleGlobalStore reference}}
Not all state needs to be global though. Component specific state should only exist in memory if a component is using it. Once user navigates to a different view and the component is destroyed, its state should be cleaned-up too. This can be achieved by adding the store to a list of component’s providers. This way we get “self-cleaning” stores that are kept in memory as long as components using them are kept in memory.
Private component stores are used in the same way as global stores by defining them as dependencies in the components’ constructors. The key difference is that these component specific stores are not singletons. Instead, Angular creates a new instance of the store each time a component depending on it is created. As a consequence, multiple instances of the same component can be present in the DOM at the same time, each one of them having its own store instance with its own state.
Subscribing to state updates in components and services
Once a store instance is injected into a component or service, this component/ service can subscribe to state updates. In the example of coffee-election component, subscribing to state updates looks like this:
@Component({...})exportclassCoffeeElectionComponentimplementsOnInit{constructor(privatestore:CoffeeElectionStore){}ngOnInit(){this.store.state$.subscribe(state=>{// Logic to execute on state update});}}
It is also possible to only subscribe to updates of a subset of state:
this.store.state$.map(state=>state.candidates).distinctUntilChanged().subscribe(candidates=>{// Logic to execute on state.candidates update});
Note that these subscriptions must be cleaned up before a component is destroyed in order to prevent memory leaks. We won’t go into details about unsubscribing in this post. Check out this topic on Stack Overflow to learn more.
Subscribing to state updates in components’ templates
In case a component doesn’t execute any logic on state update and it only serves as a proxy to pass the state to its template, Angular provides a nice shortcut to subscribe to state updates directly from templates via the async pipe. ngFor in the example below will redraw a list of candidates every time the state is updated.
describe('CoffeeElectionStore',()=>{letstore:CoffeeElectionStore;constMOCK_CANDIDATES=[{name:'Test candidate 1',votes:0},{name:'Test candidate 2',votes:5}];beforeEach(()=>{TestBed.configureTestingModule({providers:[CoffeeElectionStore]});store=newCoffeeElectionStore();store.setState({candidates:MOCK_CANDIDATES});});it('should correctly add a vote to a candidate',()=>{store.addVote(MOCK_CANDIDATES[1]);expect(store.state.candidates[0].votes).toBe(0);expect(store.state.candidates[1].votes).toBe(6);});it('should correctly add a candidate',()=>{store.addCandidate('Test candidate 3');expect(store.state.candidates[2].name).toBe('Test candidate 3');});});
Conclusion
The purpose of this post was to present how one can leverage the built in features of Angular framework to implement a simple yet powerful state management solution. The provided Coffee election example app is very simple, but the concepts it demonstrates can be used to successfully manage state in much bigger and more complex apps. At Zemanta we used observable store services to implement a rather complex feature and since the experiment worked out great we will continue to use such stores in our app going forward.
The University of Ljubljana’s Faculty of Computer and Information Science and Zemanta are co-hosting a programming competition, with a chance to win great prizes - Google Pixel 2, Google Home Max and the opportunity for a paid internship at Zemanta.
This year’s assignments are:
Alternative Ad Title Generator
Real-time Business Intelligence Analytics
Alternative Ad Title Generator
Everyone likes interesting and clickable ad titles as they are more intriguing to web users, help getting advertisers’ message across and generate more revenue for publishers. The goal of this assignment is to create an Alternative Ad Title Generator which takes the existing title and comes up with meaningful alternatives which maximize ‘clickability’.
We are looking for a teachable system which takes ad title as input, and outputs 5 automatically-generated alternatives. Outputs have to be meaningful and preferably retain the context of the original title.
You’re required to prepare your own ad title learning datasets by scraping the web or by using a public database. We’ll provide a dataset of words and their average click-through rates (CTRs) which you can use to help train your generators. We’ll also include a sample of titles, some of which will be used for assessing the results.
Your solution must be open source and contain the code for both learning and predicting. Additionally, provide the dataset used for teaching the model and a short report, clearly describing both setup instructions and your approach to solving the problem.
Your program will be tested with a subset of titles from the provided sample. We’ll submit the generated alternative titles to our Zemanta One platform, exposing your work to some of the largest publishers on the web like cnn.com, bbc.com or foxnews.com. In addition, our marketing experts will look at your generated titles and score them based on clickability and meaningfulness.
Real-time Business Data Analytics
Every time we’re browsing the web, advertisers are competing for our attention. They bid against each other for ad space offered by websites via ad exchanges. This process is called real-time bidding. Each pageview announces the start of an auction - bidders are notified that bidding is about to happen with a bid request, they respond with suitable ads and a price, the winning ad is selected by the exchange and shown to the viewer, and the winning bidder is notified of his win. After that, the viewer might or might not click on the ad, and he might or might not buy the offered item. All of these events are valuable business metrics and are therefore stored in logs. Now imagine millions of users browsing the web at the same time.
The goal of this assignment is to build a robust and scalable service that enables its users to run ad-hoc queries against such huge but well-defined amounts of data close to real-time.
You’re required to choose the best storage solution, build a pipeline that consumes and stores the data, and provide a simple programmable interface for querying that will be able to return results in just a few seconds on a consumer laptop. You can use any suitable open-source storage solution in your service.
We’ll provide a script that simulates different services by generating random logs and some example queries.
Your solution has to be open-source and it has to include setup and query instructions. Dockerized solutions are a big plus. Prepare a short report where you describe the architecture of the system and include some benchmarks.
We’ll test your service by continuously inserting thousands of logs per second, evaluate the results of a set of non-disclosed queries and measure the response times.
It’s every advertiser’s worst nightmare: advertising on a seemingly legitimate site only to realize that the traffic and/or clicks from that site are not the coveted genuine human interest in the ad. Instead they find fake clicks, unintentional traffic or just plain bots. In a never-ending quest for more ad revenue, some website publishers scramble for ways to increase traffic. And not all approaches are as respectable as improving them site’s content, its readability and SEO.
Some publishers try to boost their stats by buying cheap traffic. Unfortunately, such traffic is often of bad quality. Many sellers that purport to drive good traffic to a site at a extremely small cost actually use botnets to create that traffic.
Botnets can often be detected by looking at which sites share a common set of visitors. Of course, almost all websites share some of their visitors, but this percentage is small. Moreover, as the site accumulates more visitors, the probability of a large overlap occurring by chance becomes infinitesimal. To make things harder a botnet can, among the suspicious sites, visit several well-known and respected websites, so that the apparent credibility of the malicious sites is artificially boosted.
The key is that these botnets re-use the same machines for different “customers”, which we may be able to leverage. The question is thus, can we identify websites infested with such traffic? And if so, then how? The answer to the first question is yes, and to the second is this blog post.
Covisitation graphs
Our problem lends itself nicely to a network approach called a covisitation graph. We will construct a graph, such that the sites that share traffic will be tightly connected. Especially if visitors are shared between several sites, as is usually the case. We can represent all of the websites as vertices (nodes) in a graph. To encode the overlap between a pair or sites, we will use directed edges weighted between 0 and 1. This number will be the proportion of visitors from the source of the edge that were also seen on the target edge. An example is shown in Fig 1. Let A have 200 visitors, B have 1000 visitors, and the shared traffic be 100 visitors. The edge from A to B is the overlap divided by A’s visitors, or 100/200 or 0.5. Similarly, from B to A we have 100/1000 or 0.1. Of course, a network is no network if it’s completely connected. We must set an appropriate threshold to remove edges but keep the ones that are important. A simple threshold of 0.5 proved most useful in our case.
Fig. 1. Covisitation edge calculation example.
Clustering coefficient
To get the full network, we must repeat this calculation for all pairs of edges. This network is useful for more than just computation, as a quick visual inspection reveals many interesting things. Tight clusters of websites that are only loosely connected to the core of the graph are precisely the aberrations we would expect when several sites band together. In graph theory, they are called cliques, and have been well researched. A well-known measure of “cliqueness” is the clustering coefficient, shown in Fig. 2.
Fig. 2. A visual representation of the clustering coefficient. Image courtesy of Santillan et al.
It is a number between 0 and 1, with 0 meaning that none of the node’s neighbors are connected with each other, and 1 meaning the opposite (i.e. the node and its neighbors form a clique). We can combine this number with the probability of such a cluster occurring randomly to get a sensible measure of suspicion for each site. Thus, a small clique of 2-3 sites is somewhat likely to occur, but a clique of 20 nodes warrants a closer discerning look.
Fig. 3. Covisitation graph of all websites with at least 100 unique visitors over a 3-day span. Node size logarithmically proportional to number of visitors.
Results
The circled areas in Fig. 3 indicate exactly these occurrences. We have several groups of websites with dissimilar content where they all share each other’s traffic. One of the suspicious cliques is completely detached from the rest of the graph.
On one hand, there are going to be a lot of naturally occurring edges in the graph. Overlaps as high as 50% are not uncommon between websites of similar content and audience. On the other hand, sites should have very few outgoing edges, especially if they are popular and have many visitors. Popular sites may have many incoming edges, but as long the sources of these edges are not connected with each other it is not suspicious.
Thus, out of the vast interconnected graph that is the world wide web, we can, with precision, pick out the few bad apples that are trying to rake in revenue unfairly and at the detriment of everyone else. We mark such sites as suspicious. This list is then used to avoid buying impressions from these sites and analysing the sources of this traffic. The whole approach outlined in this blog post is one of the tools in Zemanta’s arsenal for combating invalid traffic, where the focus lies in bringing quality traffic for the best possible price.
The analysis was part of my 3-month internship at Zemanta, where I worked on detecting this type of suspicious traffic at scale. The work I’ve done was a breeze with such awesome support from the whole team. It was a great learning experience and an invaluable opportunity to work on a codebase that scales to so many requests per second. Personally, I believe that this bridging of the gap between research and industry benefits both parties immensely, and I hope to do more such collaborations in the future.
Further reading
The original covisitation approach was first used in:
Earlier this year I joined Zemanta, which as a Native Demand Side Platform operates in the real time bidding business. We bid on auctions for native ad slots when users are consuming content. When we win an auction, our client’s ad is shown to a user in a specific slot on a web page. You can imagine we process a lot of impressions per second. Zemanta chose Go to build the whole infrastructure around real time bidding, instead of high speed enterprise languages such as Java or C++/C#. Go performs well compared to Java in terms of performance, plus its GC pause is shorter on average. Technical specifications were not the main point why Zemanta went with Go, but rather because of its fast and simple development process.
Go is a relatively new programming language. As many new tech inventions, Go was created as an experiment. The goal of its creators was to come up with a language that would resolve bad practices of others while keeping the good things. It was first released in March 2012. Since then Go has attracted many developers from all fields and disciplines.
This short introduction of Go should serve as motivation for further reading. The rest of this blog post will focus on what were my steps in learning Go and some interesting patterns Go uses to efficiently solve specific problems.
Getting Started
For me learning Go started by checking Go’s official webpage. There I found installation files, tutorials, documentation, etc. I had no clue where to start, so I asked a couple of experienced Go coders. All suggested me to start with A Tour of Go. This interactive Go tutorial is great to get familiar with Go’s core ideas and syntax. I didn’t even have to install anything on my computer. All exercises can be done in an interactive web “interpreter”. I finished this tutorial in a couple of days and with that I got an idea of how things like variable initialization, pointers, structs, lists, etc. are done in Go.
I really couldn’t say I understood Go very well at that point. Still, together with my experience from other programming languages, it gave me enough knowledge to do my first task at Zemanta. I had to refactor a Hadoop MapReduce job. MapReduce is made of two functions (mapper and reducer), each accepting lines on stdin and printing lines to stdout. You can pass a mapper and a reducer as binaries to Hadoop infrastructure and it will run a MapReduce job. Go is perfect for this since it compiles into a single binary, plus you can compile it for any platform from any platform. I am working on a Mac and Hadoop usually runs on Linux, so I just had to type
GOOS=linux go build
in my terminal and upload the files to our Hadoop cluster. Cross platform build? With all the dependencies and infrastructure to run the program in one binary file? “I could get used to that”, was my first thought after checking other Go tools that come out of the box when you install Go.
No More Exceptions
By this point, I got familiar with the syntax, as well as another important part of writing big IT systems: error handling. Go’s simple approach to error handling looked too good to be true at first. In Go, functions usually return a value and an error (functions can return multiple values), so handling errors is as simple as checking the second return value. This means errors get passed around until they are finally logged, printed or cause another action. This gives a good way to chain errors from one place to another. Sounds nice, but sometimes it just doesn’t look clean if 80% of your code checks for errors. On the other hand, it forces developers to handle errors, which can avoid some critical runtime errors.
funcmapper(w*io.Writer,rio.Reader){in:=bufio.NewReader(r)for{line,err:=in.ReadBytes('\n')iferr==io.EOF{break}elseiferr!=nil{log.Error(err)}iflen(line)==0{continue}// do something with the lineerr=w.Write(line)iferr!=nil{log.Error(err)}}}
After checking all of the official resources, I started searching for other posts about Go programming patterns. I came across Go by Example which is really similar to A Tour of Go, but with a bit more line by line explanations and is organized really well. Every programming language has many ways of expressing something, similarly there are many tutorials explaining the same thing in a different way. Go by Example helped me a lot with real life examples and how to solve them. Another similar resource I came across at the same time, which is actually part of the official documentation, was Effective Go. Both helped me make my code look more “Goish”.
Implicit is Great
Go by Example explained some, at that time, strange patterns, one of them being the use of interfaces I was seeing everywhere. Why was everyone so excited about them? For example, why do we need a reader interface with only read method signature?
typeReaderinterface{Read(p[]byte)(nint,errerror)}
A waste of code in my opinion. Our struct that wants to read something will obviously implement read method. Then it finally clicked.
Let’s see why this is so neat on a practical (maybe a bit long) example.
funcprintContent(rio.Reader)error{contentBytes,err:=ioutil.ReadAll(r)iferr!=nil{returnerr}fmt.Println(string(contentBytes))returnnil}funcmain(){f1,err:=os.Open("./test")iferr!=nil{// do error handling}deferf1.Close()response,err:=http.Get("http://www.zemanta.com/")iferr!=nil{// do error handling}deferresponse.Body.Close()f2,err:=os.Open("./testZip")iferr!=nil{// do error handling}deferf2.Close()z,err:=gzip.NewReader(f2)iferr!=nil{// do error handling}deferz.Close()printContent(f1)printContent(response.Body)printContent(z)}
When you understand interfaces in Go, you understand interfaces in general. I don’t think interfaces are hard to understand, it is just that in Go they are used to do exactly what they were designed to do in any programming language - logically group code that has similar behavior, not to achieve less code, which is a consequence. In the above example, we can pass any struct that implements a ReadAll(r io.Reader) method to printContent(r io.Reader) instead of writing a handler for each specific case. We also don’t need to explicitly say those structs are implementing reader interface. This is great for us humans, but not for our IDE which needs to figure out what methods should a struct implement.
Two-value Assignment
Another cool thing about interfaces is that every type in go implements at least zero methods, which means each type implements a special zero interface{}. This is useful when we do not know the exact type of a variable.
How do we get a type from this? With type assertion. Type assertion in Go is a simple statement. If assertion fails, then the assigned value will have the default value of the type. Another way to do it is to assign a second value in type assertion statement which will hold a boolean telling you if assertion was successful. If your value can be the same as default for this type, two-value assignment is the only way to properly do type assertion.
jsonStruct:=data.(map[string]interface{})// this can failnum:=jsonStruct["num"].(int)str,ok:=jsonStruct["str"].(string)if!ok{log.Error("Couldn't convert to string")}
The same applies for retrieving values from maps.
m:=make(map[string]int)m["Answer"]=42v,ok:=m["Answer"]if!ok{log.Info("Could not get value for key Answer")}
The above example implies how we use sets in Go. Since there is no special set struct defined, we make use of maps.
idSet:=make(map[string]struct{})idSet["id1"]=struct{}{}idSet["id2"]=struct{}{}if_,ok:=idSet["id1"];ok{log.Println("id1 is in idSet")}if_,ok:=idSet["id3"];!ok{log.Println("id3 is not in idSet")}
The Great Go Book
This brings me to the last resource I used on my way to Go fluency - The Little Go Book. It is written for readers who are already comfortable with Go syntax. The book gave me another perspective on how to write idiomatic Go. It was exactly what I needed to sink in the knowledge that I accumulated over the past few weeks. It reassured me I was on the right path. While reading this book I had a lot of “Ahaaaa” moments, usually around the topics described above, and after reading it, the real fun began.
Conclusion
The whole process of going through tutorials, examples, reading posts and books took me around 5 weeks. I had programming experience before I started learning Go and I already worked with pointers and interfaces in other programming languages. During those 5 weeks I figured out a lot of general programming concepts I already heard of but never quite understood and it’s all thanks to Go. I encourage the reader to learn Go not because it is really cool and hype right now, but because you will learn a lot about programming and software development in general. Just think about the fact that Go was built on 40 years of programming experience and best practices. Technology has changed a lot in those years and so should an interface we use to manipulate it.
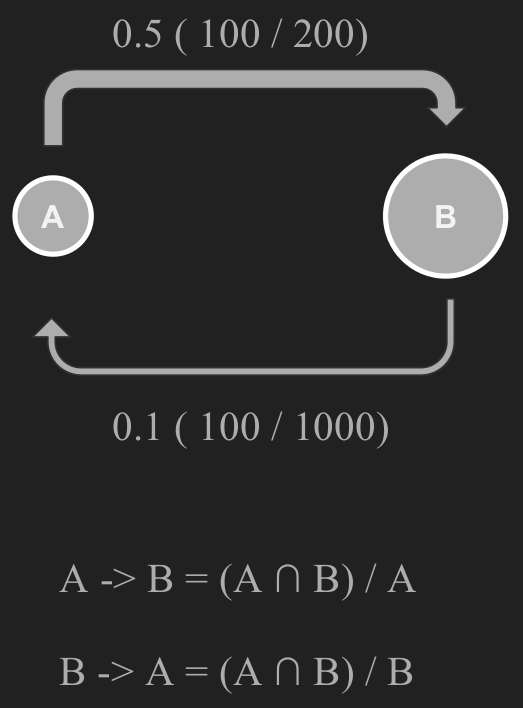 Fig. 1. Covisitation edge calculation example.
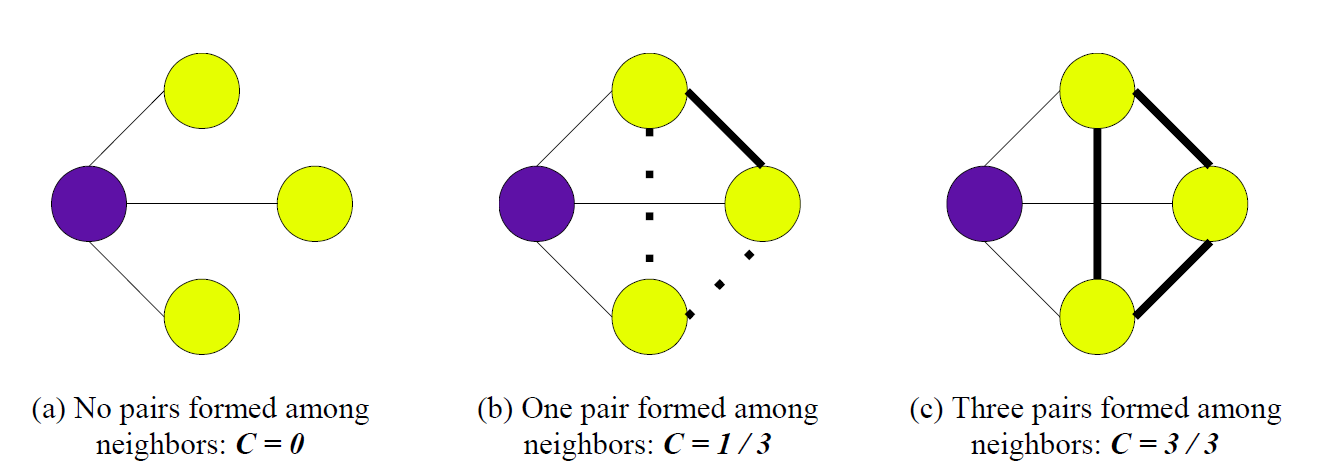 Fig. 2. A visual representation of the clustering coefficient. Image courtesy of
 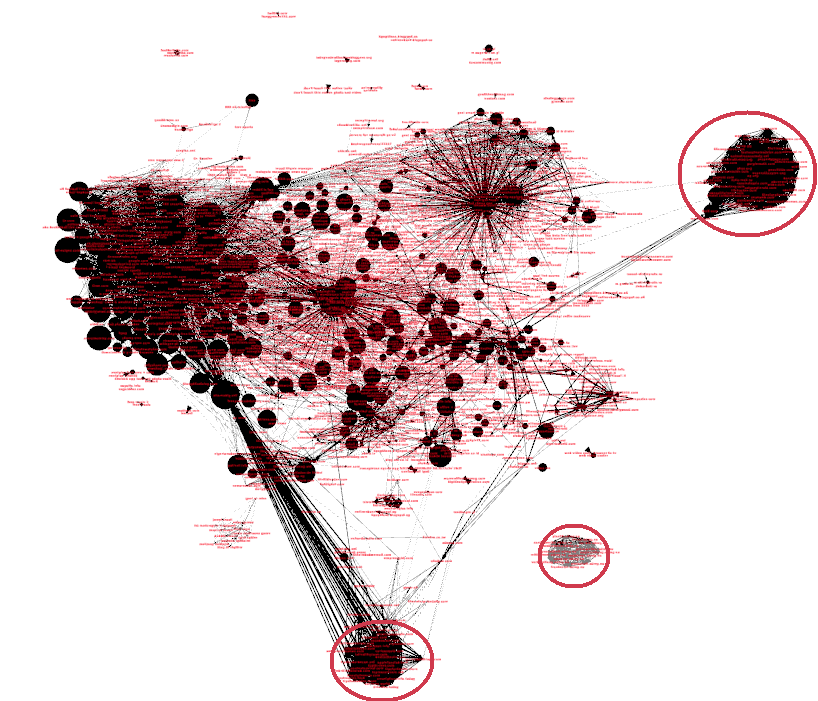 Fig. 3. Covisitation graph of all websites with at least 100 unique visitors over a 3-day span. Node size logarithmically proportional to number of visitors.